How to Install the Travel Animator MCP Server : 2026 Guide
 Jaseel S5 min read
If you’ve already been using Claude, Cursor, or some other MCP-compatible assistant, you’ve probably noticed how much friction disappears once a tool is wired in directly through MCP instead of living in a separate app. That’s exactly what the Travel Animator MCP server does for route videos – instead of opening the mobile app, tapping through stops, and picking a vehicle by hand, you just tell your assistant what you want and it handles the pipeline: planning the route, styling the animation, and rendering the final MP4, all from a normal conversation.
This guide walks through the full setup from scratch, plus a few things that tend to trip people up the first time
Who This Is Actually For
Before you install anything, it’s worth being honest about whether MCP is the right fit for how you work. If you’re already comfortable in a terminal and you’d rather describe a trip in plain language than click through a UI, this is going to feel natural almost immediately. But if you like seeing the route as you build it, previewing stops visually, or you’re making a longer film that needs footage and narration layered in afterward, you might actually get more out of the mobile app and just export the clip into a proper video editor. There’s no wrong answer here – it really just depends on whether you think in commands or in screens.
How To Install
Start by installing Python 3.12 or newer before starting. Setup time depends on your computer and MCP client
Step 1:Install the Package With The MCP
Install the mcp to include the MCP SDK. Stable releases no longer need the pre-release flag.
Terminal :
pip install “travel-animator[mcp]”
Step 2: Sign In to Your Travel Animator Account
Same account as the mobile app. On an interactive terminal this runs a magic-link flow – enter your email, then the 6-digit code.
Terminal :
travel-animator login
Step 3: Point Your AI Client at the Server
Add the server to your client’s MCP configuration and restart it. Then just ask for a video – the assistant can call auth_status to confirm you’re signed in before it starts building a trip.
MCP client config
{
“mcpServers”: {
“travel-animator-mcp”: {
“command”: “travel-animator”,
“args”: [“mcp”]
}
}
}
Check MCP Installation Status
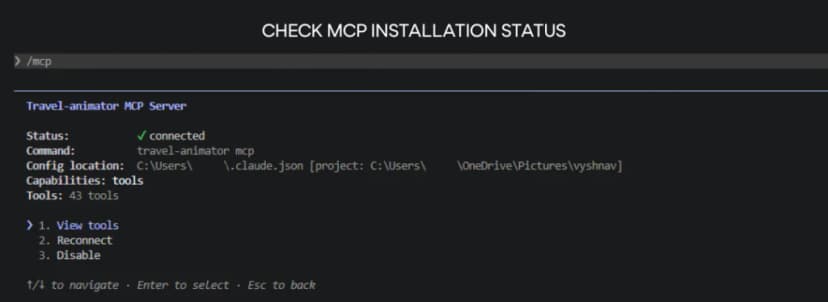
This opens a status screen. Look for two things:
Status: ✓ connected – this means it worked
Tools: 43 tools – this is the number of tools the server loaded in
If you see both, you’re all set and ready to start asking for videos. If it says anything other than connected, you’ll also see options right there to reconnect or check the tool list, so you can fix it before you even try running a real request.
A Few Prompts to Try Once It's Connected
If you want to sanity-check that everything’s working, these are good ones to start with:
- Animate my Tokyo → Kyoto → Osaka trip as a plane route and render it in 1080p.
- Plan a road-trip route from Dubai to Muscat and give it a cinematic look.
- Re-render that last video with a slower pace and a different vehicle.
- Check whether I’m signed in, then render the bundle I prepared earlier.
Things That Commonly Go Wrong
Pip says it can’t find a matching version.
This almost always comes back to the Python version. Confirm you’re on 3.12 or newer, then check PyPI directly for the current install instructions, since older guides floating around the internet sometimes reference the -pre flag that stable releases no longer need.
Rendering fails on an Intel Mac.
This isn’t a bug – local rendering simply isn’t supported on Intel hardware. MCP can hand the render off server-side instead, so you’re not completely stuck, but it’s worth knowing upfront rather than discovering it mid-render.
A credit gets used even though the render failed.
If the failure happens after the bundle has already been prepared, a credit can still get consumed even though you don’t end up with a finished video. It’s a good habit to review your stops and styling carefully before you actually authorize the render, especially the first few times while you’re still getting a feel for the workflow.
Graphics issues on Linux.
Platform wheels for macOS and Windows bundle the graphics drivers you need automatically. Linux is the exception – you’ll need a system GLES driver or Mesa installed separately, so it’s worth checking that before you assume the install itself is broken.
So, Is It Worth Setting Up?
Honestly, it depends on how you already work. If you’re someone who lives inside an AI assistant for most of your day-to-day tasks anyway, adding Travel Animator to that workflow removes an entire app from the equation – you describe the trip, review it, and get a finished video without ever leaving the conversation. But if you’re the type who wants to see the map, drag stops around, and preview things visually before committing, the mobile app is still going to feel more natural, and you can always export the clip into a video editor afterward if you’re building something longer with narration or extra footage.
Download TravelAnimator today from the App Store or Play Store and turn your next trip into a video
FAQs
What is the Travel Animator MCP server?
It’s a Python package that lets an AI assistant like Claude or Cursor plan a route, style the animation, and render an MP4 on your own computer, all from what you type in chat. You install it once, sign in, and after that you just describe the video you want
Do I need a Travel Animator account to use it?
Yes. You sign in with the same account you use in the mobile app. Free accounts can build projects, but rendering a video needs premium access and credits.
How much does it cost to render a video?
Each video uses one credit. If you re-render the same video within an hour, you won’t be charged again. One thing to know: a credit can still be used if local rendering fails after the video has been prepared.
Which AI assistants work with it?
Any client that supports MCP over stdio. That includes Claude Desktop, Claude Code, and Cursor. The config is the same small JSON block in each one.